Sending an E-Mail via Python

Sending Email using SMTP 


ext

Sending Email : 

Simple Mail Transfer Protocol (SMTP) is a protocol which handles sending e-mail and routing e-mail between mail servers. 

Python provides smtplib module which defines an SMTP client session object that can be used to send mail to any Internet machine with an SMTP or ESMTP listener daemon. 


Syntax : 


import smtplib                                                                                  # your Gmail account  

= smtplib.SMTP(‘smtp.gmail.com’, 587)                                     # creates SMTP session  

s.starttls()                                                                                            # start TLS for security   

s.login(“sender_email_id”, “sender_email_id_password”)                # Authentication 

message = “Message_you_need_to_send”                                          # message to be sent  

s.sendmail(“sender_email_id”, “receiver_email_id”, message)     # sending the  mail

s.quit()                                                                                             # terminating the session  


 Here is the detail of the parameters: 

  • Host :   

This is the host running your SMTP server. You can specify IP address of                                the host  or domain name. This is optional argument. 

  • Port :   

If you are providing host argument then you need to specifiy a port where                           SMTP server is listening. Usually this port would be 25. 

  • Local_Hostname : 

If your SMTP server is running on your local machine then you can specify just                   localhost as of this option. 


An SMTP object has an instance method called sendmail, which will typically be used to do the work of mailing a message. 

It takes three parameters: 

  1. The sender – A string with the address of the sender.  
  1. The receivers – A list of strings, one for each recipient.  
  1. The message – A message as a string formatted as specified in the various RFCs.  

Example : 

Screenshot (251) 

Example-2 :

Screenshot (253)

Important Points : 

  • This code can send simple mail which doesn’t have any attachment or any subject. 
  • One most amazing thing about this code is that we can send any number of emails using this and Gmail always put your mail in the primary section. Mails send will not be Spam. 
  • File handling can also be used to fetch email id from a file and further used for sending the emails.


                                                                                                                    Blog written by:

                                                                                                                    Rohit Sharma

Installing Python

If you want to learn to program with Python using this blog, I highly recommend installing Python. That way you don’t need to open a web browser just to write code, and you can work without an Internet connection.

It doesn’t matter which operating system you use because Python runs great on Windows, Mac OSX, Linux and many other operating systems. However, installing and launching Python are done differently on different operating systems, so just follow your operating system’s instructions.

Let’s get started!

Downloading and installing Python

Windows

Installing Python on Windows is a lot like installing any other program.

  1. Go to the official Python website (Python.org)
  2. Move your mouse over the blue Downloads button, but don’t click it. Then click the button that downloads the latest version of Python.
  3. Run the installer.
  4. Make sure that the launcher gets installed and click Install Now.

    1_vqLuolvZ5oPSaewJmhpAsw

Mac OSX

At the time of writing this, Macs don’t come with a Python 3 and you need to install it yourself. It should be like installing any other program, but unfortunately I don’t have better instructions because I don’t have an up-to-date Mac and I have never installed Python on a Mac. If you would like to write better instructions, tell me.

Linux

You already have Python 3, there’s no need to install anything. You may also have Python 2, but don’t try to remove it. Some of your programs are probably written in Python 2, so removing Python 2 would break them.

Running Python

Next we’ll learn to run Python on a PowerShell or terminal. There are several other ways to run Python, but if you learn this way now it’s going to make things easier later.

Windows

  1. Open a PowerShell from your start menu or start screen.
  2. Type py and press Enter. You should see something like this:Screenshot (62)


Other operating systems

  1. Open a terminal. How exactly this is done depends on your operating system, but most operating systems have some way to search for programs. Search for a program called terminal and launch it.
  2. Type python3 and press Enter. You should see something like this:Screenshot (63)


    Your terminal probably looks different than mine, it’s OK.

Now you can type exit() and press Enter to get out of Python. Or you can just close the PowerShell or Terminal window.


                                                                                                                    Blog written by:

                                                                                                                    Rohit Sharma

Future with Python

Python, A high level programming, next generation language and considered most one of the most popular programming. The demand amongst programmers increased rapidly in past few couple of years due to its open source and being on Top 10 high-level language. Python allows writing codes which are object oriented, functional and imperative in design.

The most popular areas for python implementations are Data Science, Machine Learning and Academic Research. Python Programming is must for Linux Admin and Automation Testing Professionals. Also Python is used in Database Programming and can be used to develop complex website & systems.

Python towards the Brighter and Secured Path…check below how it is affecting the market?

  • Voted as most favorite programming language beating C, C++ and java programing and used to develop almost every kind of application.
  • Big brands and search engine giants are using python programming to make their task easier. Google, Yahoo, Quora, Facebook are using python programming to solve their complex programming problems.
  • Versatile, Robust and Comprehensive. Easy to learn as well as it reduces the coding effort compare to other programming languages.
  • Used to write test scripts and test mobile devices performance. Python programmers are most demandable in IT industry these days and get paid more compare to other language programmer.
  • Helps solve complex problem quickly and integrate with system more effectively. Python is used in lots of environment like system development, networking, database development, Device and automation testing and many more thus python skill is must as a programmer to grow in career.
  • Python skill professionals are always more in demand and get paid more compare to other programmers.

Thus future of Python programming language is bright and secured.

Let’s overlook the environmental scan of Python in the leading industries where we will find the abrupt demand and the most desired requirement of python language exists.


As we can observe, clear existence of python requirement and implementation, we now can expect the growth of python developers in near future. The latest data from Stack Overflow Registered Users will give an immense thought of the new generation developers.

What is Machine Learning and why it is so cool??

Machine learning is the modern science of finding patterns and making predictions from data based on work in multivariate statistics, data mining, pattern recognition, and advanced/predictive analytics and it is the subset of Artificial Intelligence and again has the intersection with many fields including math and psychology.

Machine learning may sound futuristic, but it is not. Speech recognition systems such as Cortana or Search in e-commerce systems have already showed us the benefits and challenges that go hand in hand with these systems. In our machine learning series we introduced you to several tools that make all this possible.

Reasons why it is so cool :

  • The power of a well constructed machine learning approach to a problem far exceeds that of a (human) individual, and even a team.
  • It removes any psychological biases when analyzing data.
  • It gets more powerful the more data (and time) you give it.

“Google’s self-driving cars and robots get a lot of press, but the company’s real future is in machine learning, the technology that enables computers to get smarter and more personal.”

– Eric Schmidt (Google Chairman)

As a beginner, you can start with Python and move to other languages once you get the command of that. Python language is one of the most flexible languages and can be used for various purposes. Python has gained huge popularity base of this. Python does contain special libraries for machine learning namely scipy and numpy which great for linear algebra and getting to know kernel methods of machine learning. The language is great to use when working with machine learning algorithms and has easy syntax relatively. For beginners, this is the best language to use and to start with.


                                                                                                                    Blog written by:

                                                                                                                    Rohit Sharma

“BATTERIES” IN PYTHON

Django is most widely-used Python web application framework with the philosophy “batteries-included”. It is an implementation of the principle behind Batteries-Included is that the common functionality for building web applications should come within the framework instead as separate libraries.

Taking an example – URL routing, authentication, a template engine (ORM), and database schema migrations (version 1.7) are all included with the Django framework. Compare that included functionality to the Flask framework which requires a separate library such as Flask-Login to perform user authentication.

The two philosophies, batteries-included are simply two different ways how to tackle framework building. It is quite clear, neither philosophy is inherently better than the other one absolutely.

Why Django?

With Django, it is easy to take Web applications from concept to launch in a matter of hours. The Django provides hassle-free web-development so that one should focus on writing your app without needing to reinvent the wheel again. It’s completely free and an open source.

  • Ridiculously Fast

Django was designed to help developers take applications from concept to completion as quickly as  possible.

  • Fully Loaded

Django includes dozens of extras you can use to handle common Web development tasks. Django also takes care of content administration, user authentication site maps, RSS feeds and many more tasks.

  • Reassuringly Secure

Django takes security seriously and helps developers avoid many common security mistakes, such as SQL injection, cross-site scripting, cross-site request forgery and clickjacking. Its user authentication system provides a secure way to manage user accounts and passwords.

  • Exceedingly Scalable

Some of the busiest sites on the planet use Django’s ability to quickly and flexibly scale to meet the heaviest traffic demands.

  • Incredibly Versatile

From content management systems to social networks to scientific computing platforms – Companies, Organizations and Governments can use Django to build all sorts of the things.

Why Django considered as a good web framework choice?

The Django project’s stability, performance and community have grown tremendously over the past decade since the framework’s creation. Django framework continues to add significant new functionalities such as database migrations with each release. One can easily find detailed tutorials and good practice materials readily available in books and on web too. Online available competitive events will let you expand the domain.

We highly recommend the Django framework as a starting place for budding Python web developers because of above shared features and expansions. Many cities in overseas also have Django-specific groups such as Django District, Django Boston and San Francisco Django so new developers can get help when they are stuck. We can soon expect it here in India as well and we can observe here in India the evolution by Facebook, which has developed a community called “Developer Connect”.

There’s some confusion on whether learning Python by using Django is a good idea. However, that resonance of confusion is purely invalid if you take the time to learn the Python syntax and language semantics first before diving into web development.

GETTING STARTED WITH DJANGO

  • Install Django – Before using Django, you’ll first need to install Python. Go through the below steps for Django.

Install Python’s Latest Version – Python3.6 from https://python.org/downloads/ and download the executable installer and run it. Check the box next to Add Python3.6 to PATH and then click Install Now.

After installation, open the command prompt and check that the Python version matches the version you installed by executing:

python –version

Django can be installed easily using pip within your virtual environment. Be ensure, your virtual environment is active in the command prompt, and execute the following command:

pip install django

This will download and install the latest Django release. After the installation has completed, you can verify your Django installation by executing django-admin –version in the command prompt.

  •    Write your first Django app – Installed Django already? Awesome. Now step by step procedure will let you establish your own Django app. Follow the below steps:

You will have to take care of some initial setup as this is your first time using Django. Namely, you’ll need to auto-generate some code that establishes a Django project – a collection of settings for an instance of Django, including database configuration, Django-specific options and application-specific settings.


                                                                                                                    Blog written by:

                                                                                                                    Rohit Sharma

Nature Web With Python Frameworks

An open-source platform built by thousands of contributors from all corners of the world, Python is a crowd-sourcing success story. We all know python is robust, scalable, well designed, and easy to learn, a product of several years of the best minds coming together to build a language with clearly-defined features.

Below is the popularity of the languages:

The fact that it has an open-source license also means Python can be implemented and modified in any way. It’s possible to insert blocks of other code to make the language even more feature-rich, all at no cost. We can easily excess libraries to create applications for data analysis, language processing, and machine learning among many others.

With easy learning, we can perform a lot with just few lines of python code, however if coming to complex full-fetched web application from scratch in python, you might going to wrong direction. To explain, why Python frameworks are a great choice for web development — where to start with them and how, this blog is all about !!!

Any idea about Web-Framework?

Before we get into the ”why” let us first grasp what actually a Web-Framework really is ?

We can define a Web-Framework as a collection of packages and modules that provides easier development of websites. It takes care of all low-level communication within the system and also keep hide from us just to make sure no issues for performing other common tasks for the development.

Why choose a Python Web-Framework?

Yes we can create a Web-App from scratch but below are the top-5 reasons which insist to use Python Web-Framework :

  • Implemented and Believed by Many Large Corporate

Popular Python frameworks like Pyramid and Django are used by companies like Bitbucket, Pinterest, Instagram and Dropbox in their web application development. So, it is safe to say these frameworks are able to handle almost everything you throw at them.

  • Hides complex low-level details

As stated above, web frameworks are meant to hide and handle all low-level details so that you as a developer, do not have to dig deep into how everything works when you are developing a web-enabled application.

  • Takes care of the “Time” Factor

The frameworks have been built investing thousands of developer and testing hours. Building on top of it saves your valuable time. Especially, when you are developing a simple prototype of a website or are closer to a deadline, using web frameworks can turn out to be a life safer.

  • The most desired word in web. – “SECURITY”

One of the most important advantages of using a web framework as opposed to building something on your own is handling the security of your website. Since web frameworks have been used and backed by thousands, it inherently handles security, preventing any misuse of the web application.

  • Efficient and Expandable

Good frameworks are built ensuring scalability from the very beginning of the development process. So, whenever you are planning to scale your website by adding a new component or using a new database, web frameworks are more likely to scale better than what you come up with when building from scratch.

Python Web-Framework is ok !! But Which Framework to go ahead ???

There are many Python Web-Frameworks however every framework has its own level of competencies. So it is well required to evaluate the project requirements first before picking any Web-Framework of Python.

Now, here comes the Top-3 Python Web-Frameworks (As per demand):

  Django              


Django is the most popular Python Web-Framework and is targets mostly at larger applications. With batteries-included approach and contains almost everything which would be needed for web development tied-up with the framework itself. So there is no requirement to handle things like Templating, Routing, Database Administration, and Authentication….

If the requirement of project is mid-high range and compatible with python, then Django is the perfect choice!!

Pyramid


Pyramid is the most flexible and just like Django, and it is purely aimed at mid-high scale applications and more. If you found heaviness of your web-application with Django, you can choose Pyramid. Pyramid doesn’t pressure you to use only one task at a time, however rather gives you a pluggable system to plug-in according to the project requirements.

Flask                                                                                                                                    

Flask is a new baby in the family of Python Web-Framework. It’s a micro-framework and works perfectly for small-scale applications. Though, it’s a kid however it also have the features of other frameworks like Unit-Testing and Built-In development server which enable to create reliable and most efficient web applications.

Points to Note when to start with Python Frameworks:

Understand Python and HTML

  • The ground-up knowledge is must to develop, once done with the knowledge of Python powers equally important to learn the HTML and JS. There is no escape if Modern Web-Development is the final approach and it’s just not possible without HTML and JS.

Start Guide to follow and basic architectural knowledge

  • Frameworks like Django are based on MVC and Flask uses Jinja2 templating engine, it’s always better to understand how these architectures really work.

First Application to be made “Simple”

  • Don’t rush into creating heavy web application on your first go, rather start with something basic and simple like a basic entry list.
  • This teaches you how CRUD functionalities and basic HTTP requests are handled by the framework.

Debugging is equally important

  • For a programmer, Exceptions and bugs are like best friends. Understanding and keeping your framework out of this, will take framework a long way.
  • To make the life easier, Use IDE’s like PyCharm with its smart intellisense, code optimsation tips and debugging capabilities.

Integration of third-party modules

  • If others have already done something better and focusing on the output which is required in the framework, it’s always better to use third party modules in order to save the time and man-hours.


                                                                                                                    Blog written by:

                                                                                                                    Rohit Sharma

Featured

Building a basic GUI application step-by-step in Python with Tkinter


In this blog you will learn to build a basic GUI application in Python step by step.

The aim is:

  • Mastering most common GUI techniques (widgets layout, GUI constraints, event binding, etc.)
  • Understanding each and every single method and parameter used here.
  • Serve as a basis for building your own GUI applications.

You will learn basic tips:

  • building a GUI application class,
  • creating widgets,
  • laying them in containers,
  • attaching and handling events,
  • manipulating widgets values,
  • etc.

Our constraints for this blog:

  • Do the thing with Tkinter (the standard GUI toolkit provided with Python).
  • Program it the right way
  • Use plain english
  • Explicit is better than implicit  😉

Tkinter wraps Tcl/tk so that it can be used it in Python.

If properly used – your GUI will work on all systems (Windows, Linux, MacOS X…).


OBJECTIVE :

Our objective is to create a very simple application like this:

app

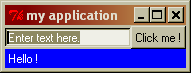
A widget is a GUI element (a button, a checkbox, a label, a tab, a pane…).
Our application has 3 widgets:

  • A text field (“Enter text here”)
  • A button (“Click me !”)
  • A blue label (“Hello !”)

The behaviour we want:

  • When ENTER is pressed in the text field, or the button is clicked, the blue label will display the text which was entered.
  • We want to constraint window resize so that window can only be resized horizontally.
  • If the window is resized, the text field and blue label will expand horizontally, like this:

app_resized

We will do this simply by Python- Tkinter.


STEP 1 : Import the GUI toolkit module

Let’s import the required module.

import Tkinter

Tkinter is part of the standard Python distribution, so we expect it to be present. We just import it.


STEP 2 : Create a class

It’s best to put our application in a class.


import tkinter

class simpleapp_tk(tkinter.tk):

In tkinter, we inherit from tkinter.tk, which is the base class for standard windows.


STEP 3 : The constructor

import Tkinter

class simpleapp_tk(Tkinter.Tk):
    def __init__(self,parent):
Tkinter.Tk.__init__(self,parent)

simpleapp_tk derives from Tkinter.Tk, so we have to call the Tkinter.Tk constructor (Tkinter.Tk.__init__()).

A GUI is a hierarchy of objects: A button may be contained in a pane which is contained in a tab which is contained in a window, etc.
So each GUI element has a parent (its container, usually).
That’s why both constructor have a parent parameter.
Keeping track of parents is usefull when we have to show/hide a group of widgets, repaint them on screen or simply destroy them when application exits.


STEP 4 : Keep track of our parent

import Tkinter

class simpleapp_tk(Tkinter.Tk):
def __init__(self,parent):
Tkinter.Tk.__init__(self,parent)
        self.parent = parent

It is a good habit, when building any type of GUI component, to keep a reference to our parent.


STEP 5 : Initialize our GUI

import Tkinter

class simpleapp_tk(Tkinter.Tk):
def __init__(self,parent):
Tkinter.Tk.__init__(self,parent)
self.parent = parent
        self.initialize()


    def initialize(self):
pass  

It’s usually best to have the portion of code which creates all the GUI elements (button, text fields…) separate from the logic of the program.
That’s why we create the initialize() method. We will create all our widgets (buttons, text field, etc.) in this method.

For the moment, the Tkinter version contains nothing (hence the pass instruction which does nothing.)


STEP 6 : Creation of main


import Tkinter

class simpleapp_tk(Tkinter.Tk):
def __init__(self,parent):
Tkinter.Tk.__init__(self,parent)
self.parent = parent
self.initialize()

def initialize(self):
        pass

if __name__ == “__main__”:
app = simpleapp_tk(None)
app.title(‘my application’)

Now we have a class, let’s use it !
We create a main which is executed when the program is run from the command-line.

In Tkinter, we instanciate our class (app=simpleapp_tk()). We give it no parent (None), because it’s the first GUI element we build.
We also give a title to our window (app.title()).


STEP 7 : Loop it !


import Tkinter

class simpleapp_tk(Tkinter.Tk):
def __init__(self,parent):
Tkinter.Tk.__init__(self,parent)
self.parent = parent
self.initialize()

def initialize(self):
        pass

if __name__ == “__main__”:
app = simpleapp_tk(None)
app.title(‘my application’)
    app.mainloop()

Now, we tell program to loop with .mainloop()

What’s that ?

It means that each program will now loop indefinitely, waiting for events (user clicking a button, pressing keys, operating system asking our application to quit, etc.).
The Tkinter and wxPython main loops will receive these events and handle them accordingly.
This is call event-driven programming (Because the program will do nothing but wait for events, and only react when it receives an event.)


STEP 8 : Layout manager


import Tkinter

class simpleapp_tk(Tkinter.Tk):
def __init__(self,parent):
Tkinter.Tk.__init__(self,parent)
self.parent = parent
self.initialize()

def initialize(self):
self.grid()

if __name__ == “__main__”:
app = simpleapp_tk(None)
app.title(‘my application’)
app.mainloop()

There are several way to put widgets in a window (or another container): Add them side by site horizontally, vertically, in grid, etc.

So there are different classes (called layout managers) capable of placing the widgets in containers in different ways. Some are more flexible than others.
Each container (window, pane, tab, dialog…) can have its own layout manager.

I recommend the grid layout manager. It’s a simple grid where you put your widgets, just like you would place things in a spreadsheet (Excel, OpenOffice Calc…).
For example: Put a button at column 2, row 1.  Pur a checkbox at column 5, row 3.  etc.
If you have to learn one, learn this one.

In Tkinter, calling self.grid() will simply create the grid layout manager, and tell our window to use it.

Now let’s add widgets.


STEP 9 : Adding the text entry


import Tkinter

class simpleapp_tk(Tkinter.Tk):
def __init__(self,parent):
Tkinter.Tk.__init__(self,parent)
self.parent = parent
self.initialize()

def initialize(self):
        self.grid()

self.entry = Tkinter.Entry(self)
self.entry.grid(column=0,row=0,sticky=’EW’)

if __name__ == “__main__”:
app = simpleapp_tk(None)
app.title(‘my application’)
app.mainloop()

To add a widget, you always:

  • first create the widget
  • and add it to a layout manager

Frist, we create the widget:

In Tkinter, we create the Entry widget (self.entry=Tkinter.Entry())

Now, time to add them to the layout manager.

In Tkinter, we call the .grid() method on the widget. We indicate where to put it in the grid (column=0, row=0).
When a cell grows larger than the widget is contains, you can ask the widget to stick to some edges of the cell. That’s the sticky=’EW’.
(E=east (left), W=West (right), N=North (top), S=South (bottom))
We specified ‘EW’, which means the widget will try to stick to both left and right edges of its cell.
(That’s one of our goals: Have the text entry expand when the window is resized.)


STEP 10 : Adding the button 


import Tkinter

class simpleapp_tk(Tkinter.Tk):
def __init__(self,parent):
Tkinter.Tk.__init__(self,parent)
self.parent = parent
self.initialize()

def initialize(self):
        self.grid()

        self.entry = Tkinter.Entry(self)
        self.entry.grid(column=0,row=0,sticky=’EW’)

        button = Tkinter.Button(self,text=u”Click me !”)
button.grid(column=1,row=0)

if __name__ == “__main__”:
app = simpleapp_tk(None)
app.title(‘my application’)
app.mainloop()

Its quite easy in this case: Create the button, and add it.

Note that in this case, we do not keep a referece to the button (because we will not read or alter its value later).


STEP 11 : Adding the label

import Tkinter

class simpleapp_tk(Tkinter.Tk):
def __init__(self,parent):
Tkinter.Tk.__init__(self,parent)
self.parent = parent
self.initialize()

def initialize(self):
        self.grid()

        self.entry = Tkinter.Entry(self)
        self.entry.grid(column=0,row=0,sticky=’EW’)

button = Tkinter.Button(self,text=u”Click me !”)
        button.grid(column=1,row=0)

        label = Tkinter.Label(self,
anchor=”w”,fg=”white”,bg=”blue”)
label.grid(column=0,row=1,columnspan=2,sticky=’EW’)

if __name__ == “__main__”:
app = simpleapp_tk(None)
app.title(‘my application’)
app.mainloop()

We also create and add the label.

  • This is a Label object in Tkinter.

For the color: We use a white text on a blue background.

  • In Tkinter, it’s fg=”white”,bg=”blue”.

For the text alignment:

  • In Tkinteranchor=”w” means that the text should be left aligned in the label.

For the label position in grid:

  • In Tkinter, this is again the .grid() method, but this time we also span it across two


    cells (so that it appears below the text field and the button.): This is the columnspan=2 parameter.

For the label expansion:

  • Again, we use sticky=”EW” for Tkinter

STEP 12 : Enable resizing


import Tkinter

class simpleapp_tk(Tkinter.Tk):
def __init__(self,parent):
Tkinter.Tk.__init__(self,parent)
self.parent = parent
self.initialize()

def initialize(self):
        self.grid()

        self.entry = Tkinter.Entry(self)
        self.entry.grid(column=0,row=0,sticky=’EW’)

button = Tkinter.Button(self,text=u”Click me !”)
        button.grid(column=1,row=0)

label = Tkinter.Label(self,
                              anchor=”w”,fg=”white”,bg=”blue”)
        label.grid(column=0,row=1,columnspan=2,sticky=’EW’)

        self.grid_columnconfigure(0,weight=1)

if __name__ == “__main__”:
app = simpleapp_tk(None)
app.title(‘my application’)
app.mainloop()

Now we tell the layout manager to resize its columns and rows when the window is resized.
Well, not the rows. Only the first column (0).

Thats grid_columnconfigure() for Tkinter..

Now try resizing the window.
See ?
Text fields and blue label now properly resize to adapt to window size.

But that’s not pretty when resizing the window vertically:


So let’s add a contraint so that the user can only resize the window horizontally.


STEP 13 : Adding constraint


import Tkinter

class simpleapp_tk(Tkinter.Tk):
def __init__(self,parent):
Tkinter.Tk.__init__(self,parent)
self.parent = parent
self.initialize()

def initialize(self):
        self.grid()

        self.entry = Tkinter.Entry(self)
        self.entry.grid(column=0,row=0,sticky=’EW’)

button = Tkinter.Button(self,text=u”Click me !”)
        button.grid(column=1,row=0)

label = Tkinter.Label(self,
                              anchor=”w”,fg=”white”,bg=”blue”)
        label.grid(column=0,row=1,columnspan=2,sticky=’EW’)

self.grid_columnconfigure(0,weight=1)
        self.resizable(True,False)

if __name__ == “__main__”:
app = simpleapp_tk(None)
app.title(‘my application’)
app.mainloop()

In Tkinter, we use .resizable(True,False) to prevent the vertical resizing of the window


STEP 14 : Adding event handlers


import Tkinter

class simpleapp_tk(Tkinter.Tk):
def __init__(self,parent):
Tkinter.Tk.__init__(self,parent)
self.parent = parent
self.initialize()

def initialize(self):
        self.grid()

        self.entry = Tkinter.Entry(self)
        self.entry.grid(column=0,row=0,sticky=’EW’)
        self.entry.bind(“”, self.OnPressEnter)

button = Tkinter.Button(self,text=u”Click me !”,
command=self.OnButtonClick
)
        button.grid(column=1,row=0)

label = Tkinter.Label(self,
                              anchor=”w”,fg=”white”,bg=”blue”)
        label.grid(column=0,row=1,columnspan=2,sticky=’EW’)

self.grid_columnconfigure(0,weight=1)
self.resizable(True,False)

    def OnButtonClick(self):
print “You clicked the button !”

def OnPressEnter(self,event):
print “You pressed enter !”

if __name__ == “__main__”:
app = simpleapp_tk(None)
app.title(‘my application’)
app.mainloop()

Event handlers are methods which will be called when something happens in the GUI.
We bind the event handlers to specific widgets on specific events only.
So let’s do something when the button is clicked or ENTER pressed in the text field.

  • We create a OnButtonClick() method which will be called then the button is clicked.
  • We create a OnPressEnter() method which will be called then ENTER is pressed in the text field.

Then we bind these methods to the widgets.

For the button:

  • In Tkinter, simply add command=self.OnButtonClick

For the text field:

  • In Tkinter, we use a .bind() method.
    “” is the key we want to catch.
    self.OnPressEnter is the method we want to be fired when this event is catched.

Therefore:

  • Clicking on the button will trigger the OnButtonClick() method.
  • Pressing ENTER in the text field will trigger the OnPressEnter() method.

STEP 15 : Changing the label

import Tkinter

class simpleapp_tk(Tkinter.Tk):
def __init__(self,parent):
Tkinter.Tk.__init__(self,parent)
self.parent = parent
self.initialize()

def initialize(self):
        self.grid()

        self.entry = Tkinter.Entry(self)
        self.entry.grid(column=0,row=0,sticky=’EW’)
self.entry.bind(“”, self.OnPressEnter)

button = Tkinter.Button(self,text=u”Click me !”,
command=self.OnButtonClick)
        button.grid(column=1,row=0)

        self.labelVariable = Tkinter.StringVar()
        label = Tkinter.Label(self,textvariable=self.labelVariable,
                              anchor=”w”,fg=”white”,bg=”blue”)
        label.grid(column=0,row=1,columnspan=2,sticky=’EW’)

self.grid_columnconfigure(0,weight=1)
self.resizable(True,False)

def OnButtonClick(self):
        self.labelVariable.set(“You clicked the button !”)

def OnPressEnter(self,event):
self.labelVariable.set(“You pressed enter !”)

if __name__ == “__main__”:
app = simpleapp_tk(None)
app.title(‘my application’)
app.mainloop()

Now let’s change the label.

  • Under Tkinter, this is a bit more tricky. You have to:
    • create a special Tkinter variable (self.labelVariable = Tkinter.StringVar())
    • then bind it to the widget (textvariable=self.labelVariable)
    • then use set() or get() to set or read its value (self.labelVariable.set(“You clicked the button !”))

In Tkinter, each time you want to read or set values in a widgets (text field, label, checkbox, radio button, etc.), you have to create a Tkinter variable and bind it to the widget. There are several Tkinter variable types (StringVar, IntVar, DoubleVar, BooleanVar).


STEP 16 : Display the value


import Tkinter

class simpleapp_tk(Tkinter.Tk):
def __init__(self,parent):
Tkinter.Tk.__init__(self,parent)
self.parent = parent
self.initialize()

def initialize(self):
        self.grid()

self.entryVariable = Tkinter.StringVar()
        self.entry = Tkinter.Entry(self,textvariable=self.entryVariable)
        self.entry.grid(column=0,row=0,sticky=’EW’)
self.entry.bind(“”, self.OnPressEnter)
        self.entryVariable.set(u”Enter text here.”)

button = Tkinter.Button(self,text=u”Click me !”,
command=self.OnButtonClick)
        button.grid(column=1,row=0)

self.labelVariable = Tkinter.StringVar()
        label = Tkinter.Label(self,textvariable=self.labelVariable,
                              anchor=”w”,fg=”white”,bg=”blue”)
        label.grid(column=0,row=1,columnspan=2,sticky=’EW’)
        self.labelVariable.set(u”Hello !”)

self.grid_columnconfigure(0,weight=1)
self.resizable(True,False)

def OnButtonClick(self):
self.labelVariable.set( self.entryVariable.get()+” (You clicked the button)” )

def OnPressEnter(self,event):
        self.labelVariable.set( self.entryVariable.get()+” (You pressed ENTER)” )

if __name__ == “__main__”:
app = simpleapp_tk(None)
app.title(‘my application’)
app.mainloop()

Now let’s read the value of the text field and display it in the blue label.

In Tkinter, we have to create a Tkinter variable again, so that we can do self.entryVariable.get().

As we have a text variable to access the Tkinter text field content, we can also set the default value (“Enter text here.” and “Hello !”)


STEP 17 : Small refinement: auto-select the text field


import Tkinter

class simpleapp_tk(Tkinter.Tk):
def __init__(self,parent):
Tkinter.Tk.__init__(self,parent)
self.parent = parent
self.initialize()

def initialize(self):
        self.grid()

        self.entryVariable = Tkinter.StringVar()
        self.entry = Tkinter.Entry(self,textvariable=self.entryVariable)
        self.entry.grid(column=0,row=0,sticky=’EW’)
self.entry.bind(“”, self.OnPressEnter)
self.entryVariable.set(u”Enter text here.”)

button = Tkinter.Button(self,text=u”Click me !”,
command=self.OnButtonClick)
        button.grid(column=1,row=0)

self.labelVariable = Tkinter.StringVar()
        label = Tkinter.Label(self,textvariable=self.labelVariable,
                              anchor=”w”,fg=”white”,bg=”blue”)
        label.grid(column=0,row=1,columnspan=2,sticky=’EW’)
self.labelVariable.set(u”Hello !”)

self.grid_columnconfigure(0,weight=1)
self.resizable(True,False)
        self.entry.focus_set()
self.entry.selection_range(0, Tkinter.END)

def OnButtonClick(self):
self.labelVariable.set( self.entryVariable.get()+” (You clicked the button)” )
        self.entry.focus_set()
self.entry.selection_range(0, Tkinter.END)

def OnPressEnter(self,event):
        self.labelVariable.set( self.entryVariable.get()+” (You pressed ENTER)” )
        self.entry.focus_set()
self.entry.selection_range(0, Tkinter.END)

if __name__ == “__main__”:
app = simpleapp_tk(None)
app.title(‘my application’)
app.mainloop()

Here is a small refinement: The text field will be automatically selected is the user presses ENTER or clicks the button, so that he/she can immediately type a new text again (replacing the existing one.).

We first set the focus in this element (focus_set() or SetFocus()), then select all the text (selection_range() or SetSelection()).


STEP 18 : Tkinter resize hiccup

import Tkinter

class simpleapp_tk(Tkinter.Tk):
def __init__(self,parent):
Tkinter.Tk.__init__(self,parent)
self.parent = parent
self.initialize()

def initialize(self):
        self.grid()

        self.entryVariable = Tkinter.StringVar()
        self.entry = Tkinter.Entry(self,textvariable=self.entryVariable)
        self.entry.grid(column=0,row=0,sticky=’EW’)
self.entry.bind(“”, self.OnPressEnter)
self.entryVariable.set(u”Enter text here.”)

button = Tkinter.Button(self,text=u”Click me !”,
command=self.OnButtonClick)
        button.grid(column=1,row=0)

self.labelVariable = Tkinter.StringVar()
        label = Tkinter.Label(self,textvariable=self.labelVariable,
                              anchor=”w”,fg=”white”,bg=”blue”)
        label.grid(column=0,row=1,columnspan=2,sticky=’EW’)
self.labelVariable.set(u”Hello !”)

self.grid_columnconfigure(0,weight=1)
self.resizable(True,False)
        self.update()
self.geometry(self.geometry())
        self.entry.focus_set()
        self.entry.selection_range(0, Tkinter.END)

def OnButtonClick(self):
self.labelVariable.set( self.entryVariable.get()+” (You clicked the button)” )
self.entry.focus_set()
        self.entry.selection_range(0, Tkinter.END)

def OnPressEnter(self,event):
        self.labelVariable.set( self.entryVariable.get()+” (You pressed ENTER)” )
self.entry.focus_set()
        self.entry.selection_range(0, Tkinter.END)

if __name__ == “__main__”:
app = simpleapp_tk(None)
app.title(‘my application’)
app.mainloop()

Tkinter has a small resize hiccup: It will try to accomodate window size all the time to widgets. This is nice, but not always a desired behaviour.
For example, type a loooooooong text in the text field, press ENTER: The window grows.
Type a short text again, press ENTER: the window shrinks.

You usually do not want your application window grow and shrink automatically all the time. The users will not like that.

That’s why we fix the size of the window by setting the window size to its own size (self.geometry(self.geometry())).
This way, Tkinter will stop trying to accomodate window size all the time.
(And we perform an update() to make sure Tkinter has finished rendering all widgets and evaluating their size.)

We’re done !

On running the above code, we will get the output like this:

app

And after clicking on the maximize button, the appeared window will be extended this this:

app_resized

Blog written by;

Rohit Sharma


Entry Widgets:

Entry Widgets:

Entry widgets are the basic widgets of Tkinter used to get input, i.e. text strings, from the user of an application. This widget allows the user to enter a single line of text. If the user enters a string, which is longer than the available display space of the widget, the content will be scrolled. This means that the string cannot be seen in its entirety. The arrow keys can be used to move to the invisible parts of the string. If you want to enter multiple lines of text, you have to use the text widget. An entry widget is also limited to single font.

The syntax of an entry widget looks like this:

w = Entry(master, option, … )

“master” represents the parent window, where the entry widget should be placed. Like other widgets, it’s possible to further influence the rendering of the widget by using options. The comma separated list of options can be empty.

The following simple example creates an application with two entry fields. One for entering a last name and one for the first name. We use Entry without options.

Screenshot (19)

The window created by the above script looks like this: 

Screenshot (20)

Okay, we have created Entry fields, so that the user of our program can put in some data. But how can our program access this data? How do we read the content of an Entry?

To put it in a nutshell: The get() method is what we are looking for. We extend our little script by two buttons “Quit” and “Show”. We bind the function show_entry_fields(), which is using the get() method on the Entry objects, to the Show button. So, every time this button is clicked, the content of the Entry fields will be printed on the terminal from which we had called the script.

Screenshot (21)

The complete application looks now like this:

Screenshot (22)

Now,

Let’s assume now that we want to start the Entry fields with default values, e.g. we fill in “Miller” or “Baker” as a last name, and “Jack” or “Jill” as a first name. The new version of our Python program gets the following two lines, which can be appended after the Entry definitions, i.e. “e2 = Entry(master)”:

e1.insert(10,”Miller”)

e2.insert(10,”Jill”)
What about deleting the input of an Entry object, every time, we are showing the content in our function show_entry_fields()? No problem! We can use the delete method. The delete() method has the format delete(first, last=None). If only one number is given, it deletes the character at index. If two are given, the range from “first” to “last” will be deleted. Use delete(0, END) to delete all text in the widget.

Screenshot (23)

The output will be shown like this :

Screenshot (24)

The next example shows, how we can elegantly create lots of Entry field in a more Pythonic way. We use a Python list to hold the Entry descriptions, which we include as labels into the application .

Screenshot (25)

If you start this Python script, it will look like this:

Screenshot (26)

Now, You can fill all these entry to show on the output screen of your IDE , or you can simply exit this window by clicking on Quit button.


                                                                                                                    Blog written by:

                                                                                                                    Rohit Sharma

Create a MessageBox

Create a MessageBox :
To show a message box using Tkinter, you can use messagebox library like this:

1. from tkinter import messagebox
2. messagebox.showinfo(‘Message title’ , ‘Message content’)

Pretty easy!!

Let’s show a message box when the user clicks a button.

Screenshot (30)
The output of the above code is shown below:
Screenshot (31)

And when you will press the created button, a messagebox will appear on the screen as shown below:

Screenshot (32)


                                                                                                                    Blog written by:

                                                                                                                    Rohit Sharma